Announcement

Collapse
No announcement yet.

Deadly Nancy's Progression

Collapse
X
 
  • Filter
  • Time
  • Show
Clear All
new posts

  • #16
    Re: Deadly Nancy's Progression

    I found some time to update this!

    I've got bunches of pictures, so I'll probably spread them out rather than post them all at once.

    Back in June (or was it July?) I painted my calipers. I had a hard time deciding whether to go with an incredibly metallic purple, black, or red. After much thought (about 5 minutes ;-) ) I decided Red would stand out the most.


    And of course, I gave the back of the wheels some serious cleaning while they were off and paint was drying. I waxed the back of them too so future cleaning would be easier.


    Wheels back on:


    My Progression

    Comment


    • #17
      Re: Deadly Nancy's Progression

      I added some UV led's in the air vents, connected to the dimmer switch, and also a manual switch hidden in the small compartment below the steering wheel so I can turn them off if needed.


      I put three LED's in each vent, and have plenty extra lying around for.. who knows.
      My Progression

      Comment


      • #18
        Re: Deadly Nancy's Progression

        *Driving, driving, driving, red light, green light, vroom! SPLASH*

        That pretty much sums this up.


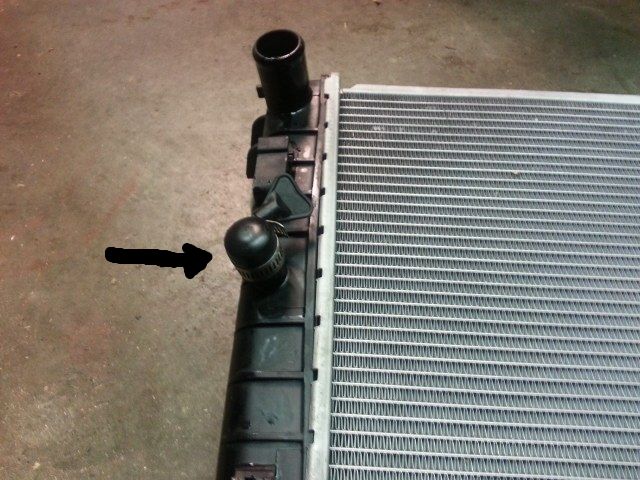
        And with that, radiator #3 is no more. No cracks, just came apart at the seam. Had to get a tow 1.1 miles home.

        Talking to the radiator shop, he said radiator #4 is the last one they will give me, and that I've clearly got a pressure leak somewhere in my engine, most likely head gaskets. That's just peachy.

        So $400 later I have a head gasket replacement kit and new bolts (Reusing bolts in an aluminum block is a no-no).

        While we had it apart we decided to clean everything.

        Prepped for surgery:


        Workbench prepped as well:


        Couldn't see any visible problems with these..


        I don't think the previous owner ever used engine cleaner in their gas..


        Let this soak in each cylinder overnight:


        In the meantime I cleaned up the heads and the intake manifold:


        Scrub scrub scrub


        Shiny!


        Heads go back on..


        Push rods and rockers go back on..


        And apparently I was in too much of a hurry after that so I didn't take any more pictures. Sorry bout that.

        Anyway, started her up and haven't shown any signs of leakage, and it's been about 5 months. Radiator's still holding up fine. But I really don't get on it all that often..

        Between that and a sparkly ring (she said yes, of course!) and all the expenses that come with that, I'm pretty much not going to be able to do much to the g6 anytime soon. Although I did spend half of my Christmas bonus on new speakers.. I'll post pics of that later.
        My Progression

        Comment


        • #19
          Re: Deadly Nancy's Progression

          I've got a new head unit coming in the mail tomorrow! I didn't spend for a top end unit, so it may work poorly, but reviews I've read seem to say its pretty fantastic so here's to hoping!

          Basically It came down to the factory unit just won't put out a balanced mix at all levels, it doesn't play digital media, has no sub level control, and its balance and fade don't play well with my aftermarket amps. I bought it through Crutchfield because they sold me the Metra dic kit half off when buying a head unit from them. Also coming is a Rockford Fosgate 1 farad capacitor. My lights don't dim, and my battery seems fine, but I currently get alternator noise from my speakers, and it just makes more sense to protect my alternator and battery, and consequently every other electrical component on my car, by having one.

          Hopefully I can get that installed this weekend!
          My Progression

          Comment


          • #20
            Re: Deadly Nancy's Progression

            very nice! good thorough engine clean up!
            sigpic

            2004 LS1 A4 Quicksilver w/ Red Interior 1 of 301 -

            GO-K&N Intake, Spintech Exhaust, Pacesetter Headers, Catless Mids, Tuned using HPTuners By Rian

            Turning and Stopping- Cquence Drilled and Slotted Rotors

            Show- SAP Repros in Satin black, fake SAP mod, Tinted tails by Jorge, Satin Black Badges, 35% tint all around, Satin Black painted 17's, Flat Splitter

            Electronics- Pioneer AVIC F90BT, JL 500.1 Monoblock Amp, JL 12W3-2, DDMTuning 8k 55watt HID hi/low, All Interior and Cluster LED Swap by Bohnman,

            Fully modded G6 GTP-TRADED

            Comment


            • #21
              Re: Deadly Nancy's Progression

              My 2007 G6 with the LZ4 went through three radiators in an eighteen month period. The first two failures were caused by cracks in the passenger side tank. The third failure was a crack in the drivers side tank. The fourth failure thankfully was not the radiator but the rubber cap that blew off and dumped coolant out as I accelerated from a traffic light with a loud pop. With the rubber cap replaced along with a new rad cap it has been trouble free for almost two years.

              A word of advice is keep a close eye on this rubber cap and periodically try to carefully tighten it and if you hear a pop pull over and turn your car off ASAP.


              Current Mods
              245/45/17 Bridgestone Potenza RE-01 R, 245/45/17 Bridgestone Blizzak WS60, Eibach springs, Debadged, Recessed upper grills, GTP rear valance, GXP exhaust, Redline Tuning QuickLifts, K&N air filter, GMPP strut tower brace, Steering wheel stereo controls, Baer Cobalt 13" front brakes, Cobalt SS 11.75" rear brakes, Stainless steel braided brake lines front & rear, Leather steering wheel, Recessed lower grills, Leather shifter handle, Leather parking brake handle, Leather console lid cover, Volant intake, PIAA H9 & H11 Xtreme White Plus headlights & driving lights, 93 octane tuned ECM & TCM, Custom painted headlights, Motorsport Tech wheel adapters, C5 Corvette 17" x 8.5" wheels, Koni Sport struts and shocks, MSD 8.5mm Super Conductor plug wires, Racingline polyurethane motor mount inserts...
              Altered6 Progression Page

              Comment


              • #22
                Re: Deadly Nancy's Progression

                So It finally got nice yesterday. So I spent some good time polishing and waxing the vert. Snaped a few good overdue pictures.


                My Progression

                Comment


                • #23
                  Re: Deadly Nancy's Progression

                  A couple of weeks ago I noticed something while washing my car that made my stomach turn.


                  I'm completely baffled as to how it happened. I take pretty good care of her, but apparently I never noticed the paint in this spot having no more clearcoat/thinning exposed paint. It's on the top of the passenger door right below the chrome molding and above the handle.

                  I just ordered some touch up paint off ebay for $13. The sight of it still makes me cringe.
                  My Progression

                  Comment


                  • #24
                    Re: Deadly Nancy's Progression

                    I was able to touch up my door paint issue just in time before the rain came. Thank goodness.

                    I've also ordered some LEDs to decorate my interior with. Should be a fun weekend!
                    My Progression

                    Comment


                    • #25
                      Re: Deadly Nancy's Progression

                      that should be sweet man
                      Get out the way!

                      to many things to list and also change my mind way to much to actually tell people lol

                      Comment


                      • #26
                        Re: Deadly Nancy's Progression

                        It's time for fun with LEDs!

                        In today's episode we will replace the 3mm bulbs in the door locks and mirror adjuster with UV LEDs!


                        **DISCLAIMER: These parts are very small and modifying them may result in making them inoperable. Mod at your own risk.**

                        Here is a door lock switch:

                        The light emitted from that tiny lightbulb shines through this translucent red rubber piece, giving off a red glow.
                        Another thing to note is that (light emitting)Diodes are NOT polarity neutral. This means current can only flow one direction through them, unlike lightbulbs which only need to complete a circuit. So when changing bulbs to LEDs, you must first figure out which side is Vcc and which side is ground.

                        First things first; Since these incandescent light bulbs require 12V to opperate and LEDs can't handle more than 5V, we need to add a resistor in series with the LED:


                        To hold small components steady without damaging them, I use a small rubber vice. It is seen in this photo holding the switch circuit board:


                        Once you solder the ends to the connection plates on the circuit board, you will need to cut off the excess wire:


                        Now you have to cut off the part of the red rubber piece that covered the lightbulb, make sure to be extra careful as it rips very easily once the initial cut is made:


                        On to the mirror adjuster!


                        ...


                        Hm.

                        Well this is new! Looks like this piece has an IC completely in our way of being able to do anything to the back. "But Mr. Deadly Nancy," you might ask, "how can we determine which side is ground without knowing the architecture of the IC?" First things first, since I'm not going to be able to solder anything to the back of the board, we have to break the lightbulb off right where the two leads go in. So wiggle it back and forth until hopefully it snaps free.

                        Success:


                        Now, take this piece, along with your LED + resistor and go plug it in to the car, turn the lights on, and figure out which side is which! The LED will light only when its going the right direction. Oncy I figured that out it was time to solder the LED to the tiny strands left over from the lightbulb:


                        I was using the smallest soldering tip I own, its a 2mm tip, making such small spaces hard to work with. BTW, the Positive side is the one closes to the center of the board.
                        Now that it's soldered, take a multimeter and set it to diode mode, and make sure our LED lights up:
                        Huzzah:


                        Cut a hole in this red rubber piece as well:


                        Now go plug them in to make sure they work, then put them back together and presto!:


                        You might notice that one of the triangles shines brighter than the rest. This is because my LED stuck up too far in the switch. Someday I will try and shorten it.

                        This concludes another episode of Fun with LEDs!

                        Sneak Peak of the next episode:
                        My Progression

                        Comment


                        • #27
                          Re: Deadly Nancy's Progression

                          Way to go on the mod. LEDs have two legs, one is longer than the other and has a flat side on the casing, signifies that it is the cathode which is (-). Other side is the anode which is (+). This way you don't have to apply voltage/current to figure out which side is which, just some info for you. This doesn't apply to all LEDs but the type used here it does.
                          Additions:
                          Crabs FPU w/03 | Black Altezza Taillights | White LED Conversion (Maps, Dome, Trunk and License)
                          Black Eagle Eye Headlights | DDM 55W 10k Highs H1 and 10k Lows H7 HIDs
                          Personal License Plate [DEFY] | Blacked-out Pontiac Arrows | High Offset Black & Chrome MKW Rims
                          Cooper Tires: Zeon RS3-A 235/40 | Bosch Premium Oil Filter | Mobil 1 Oil | WEAREVER GOLD Ceramic Brake Pads

                          Progression Thread: [Quick Link]
                          sigpic

                          Comment


                          • #28
                            Re: Deadly Nancy's Progression

                            Right. I was referring to figuring out on the circuit boards that are not marked which side is which.
                            My Progression

                            Comment


                            • #29
                              Re: Deadly Nancy's Progression

                              So every now and then, after driving a long distance, parking the car for an hour or more, and then driving it again, I'll come to the first real stop and then give it a fair amount of throttle and it acts like its a manual transmission with barely enough clutch to start moving. After a little hesitant lag it then jolts, much like dumping a clutch with barely enough RPM.

                              That's the best way I think I can describe the issue. It could be related to so many things that I wont even bother naming them. This has happened more and more frequently. However last Tuesday on my way to work, after about 45 minutes of freeway at 70-ish MPH, the traction control started randomly spazing out. It would flash the light and the DIC would chime at me. After the first 5 times of doing this, it started to tell me "service traction" each time it happened. The error stayed on just as long as the normal loss of traction warning, then it would go off and come back whenever it happened again. At this point I decided to turn the T/C off and about a minute later it starts spazing again telling me "Service Traction". After power cycling the car, it hasn't done that too me since. random fluke? Idk. In the year and 5 months I've owned the car it's never once thrown a CEL. Still hasn't to this day.

                              Regardless It's currently at a local transmission shop getting serviced. Hopefully a good flushing will solve all issues, but they also said they'd hook a scanner up to see if it has set any codes.

                              Here's to hoping it acts up on them during their test drive.
                              My Progression

                              Comment


                              • #30
                                Re: Deadly Nancy's Progression

                                I had this along with a "pulsating" or felt like a clutch slipping at speed. My 1st gear and reverse clutch pack had to be replaced twice. The second time the dealership also replaced damn near everything else because of the extreme wear. It would have cost me ~4k for parts and labor, fortunately it was under warrantee.

                                Next time it happens (hopefully not soon, knock on wood*) I'm buying a built trans from zzp or milzy.

                                My Progression Page: click here

                                Comment

                                Working...
                                X