
 Tweet
Tweet
Thats right people! The how-to youve been waiting for!
To begin with, you have three brands of suspension to choose from. KW (most expensive), Ksport (alot less expensive), and what i chose, The Megan Racing variety. Design wise, the Ksport and Megan Racing are the same. the KW brand however, although more expensive, does not allow for adjustable camber and you need to buy extra components to make it come together.
This install is Megan Racing specific. i dont know if the ksport coilovers are EXACTLY the same, so i wont say they are, or that this how-to is directly applicable to both.
Part # for this install: MEG-MR-CDK-S9306
My humble suggestion would be, start with the rears. If worse comes to worse, and you find yourself at a lack for time, these go in substantially faster than the fronts. theres two bolts, and four nuts involved here. simple.
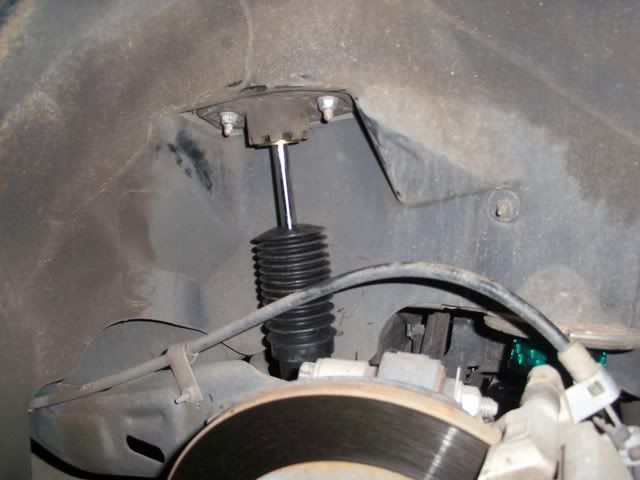
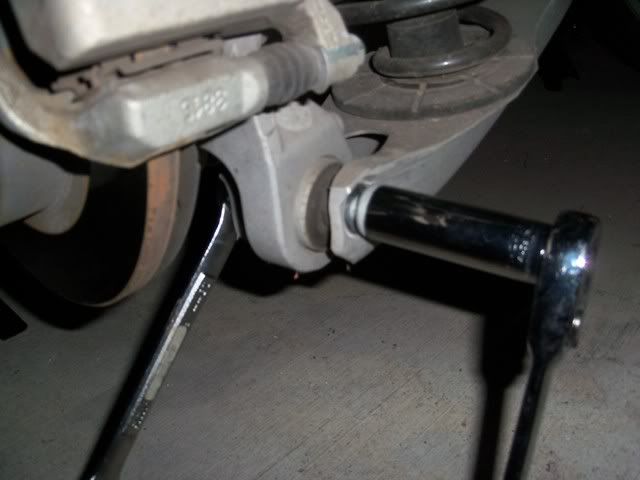
Using jackstands, support the rear of the vehicle on both sides. Then, with the wheel off, support the lower arm the spring rests on with a jack. Next, remove the two nuts securing the top of the shock to the body as well as the bolt holding the lower portion of the shock to the knuckle. With the shock out, you must now take the nut fastening it to the mount off. Grab the protruding metal tip with pliers or a vice grip so the whole assembly doesnt spin when loosening the nut.
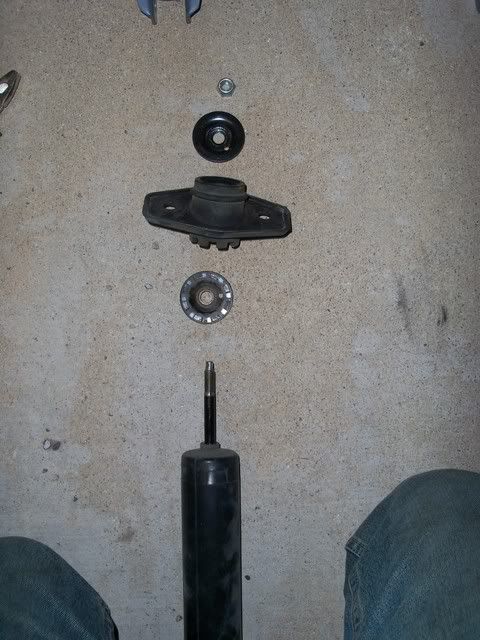
To install the new damper requires you do everything in reverse with two little exceptions. The concave plate on the bottom of the mount is not needed as the new damper comes with a flat one, which fits flush in the bottom of the mount; the top one can stay. This is nessisary because the original plate shortens the amount of threads coming through the other side of the mount, making it nearly impossible to get a safe number of threads through the nut. speaking of which. the second exception, one of the two nuts that comes on the new damper is all you need to safely secure it in the mount; the old one is no longer needed. And there you have your rear dampers. Also be sure to use lock tite on the lower bolt as it uses nothing but torque to hold it in place, theres no nut there. (use a breaker bar for leverage.)
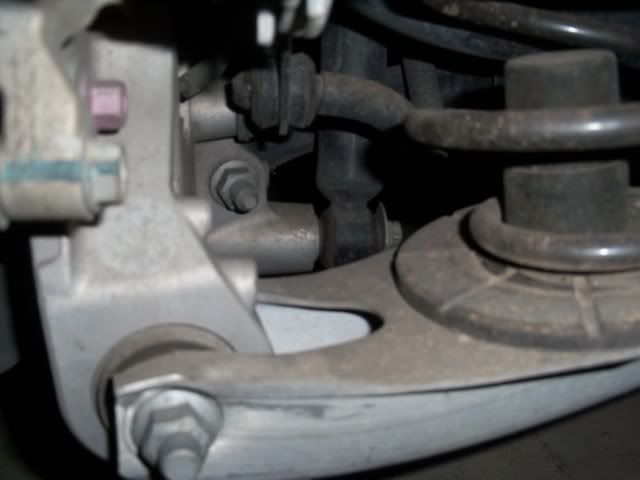
Next, to install your new rear adjustable springs, ensure that the arm the spring sits on is supported by a jack. otherwise you might be in for a little hurt when it comes free. There is a bolt and nut that attatch the arm to the knuckle. Remove them both and the arm should swing downward freely once you remove the jack. push down on it to retreive the old spring. What i have found through viewing the images of wormhole's install, as well as in my own expirience, is it is nessisary to remove the rubber seats for the old springs so as to ensure the spring assembly sit correctly, and so proper ride height front to rear can be achieved. Be sure everything youve unbolted and rebolted up is all torqued down nice and tight before you move to the fronts, its a PITA to have to go back and fix something you couldnt get right the first time.
On to the fronts!
OKAY. I'll be entirely honest. These are plausibly a one man job. But i must tell you two sets of hands makes life dramatically easier. And if you have changed out your front suspension before then this should be a piece of cake. I personally did not need a spring compressor at any point during this install. I had eibach springs in to begin with so that may have been a factor.
Where do i begin?
Jack up the front end and support both sides with jackstands. Remove the wheel, and detatch the brake lines from the strut. Depending on which direction the sway bar endlink is getting pushed, either being pulled up on or pushed down on by the strut mount, youll either have to push up on the the brake disk or the sway bar to take the stress off the top endlink mounting point. Using vice grips, hold the tip of the bolt stationary, while using a wrench to loosen the bolt holding the link in place. once that is done you can let the link hang off to the side, it wont be in your way. Now, with the lower arm supported, remove the studs holding the strut to the knuckle. once this is accomplished, remove the three nuts holding the strut to the strut tower. With that step completed, you should be able to lower the jack, and the stut will come down from the mount easilly. Now that the strut is removed, the one complicated thing about this install happens. The bolts that hold the normal strut to the the strut tower are not reusable. They are riveted into the original mount. because of this, you'll have to head over to home depot, to get six 8mm-1.25x40mm bolts in the hardware dept. Any shorter and your strut tower bar isnt going to fit properly. you will also need eight washers, i reccomend getting two sizes larger(10mm) so theyre easier to work with and you may as well get a few more than you need just in case.
The two pillowball mounts are exactly identical. this means, for some reason, to make them fit correctly, the driver side mount needs to be flipped. This means you lose the camber markings on that side, so mark where center is before you flip it.
The easiest way to mount these front suckers is top to bottom. So having taken the camber plates off the coilovers, put your shiney new bolts through the holes. One of the holes you will be using does not have the threaded sleeve so youll have to screw the nuts on the other two when mounting to the tower first, then stick the third bolt up through the plate and tower to have its nut tightened onto it. This is because the third threaded sleeve you would have used does not match up with the corresponding hole on the strut tower. So you must use the next hole beside it. The two plates shold look symmetrical beside one another before and after they are bolted into the strut tower.
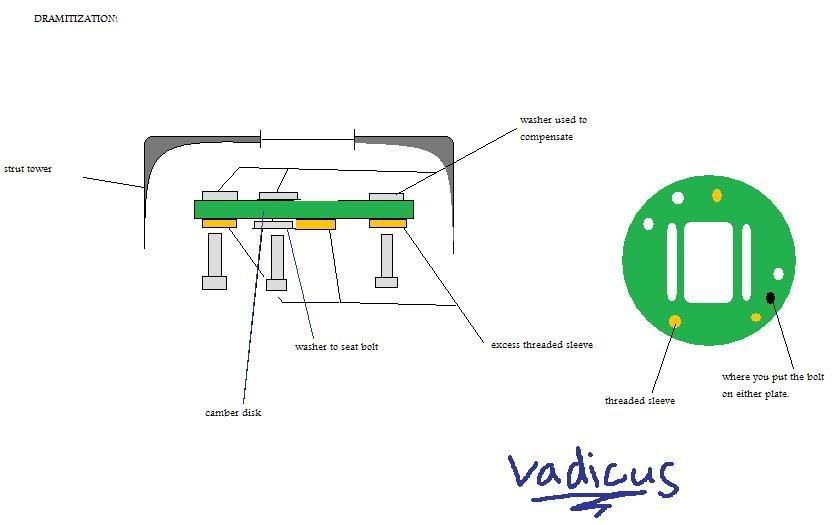
^this diagram is just intended to help you get an idea for what im saying, as far as washers and bolt placement^
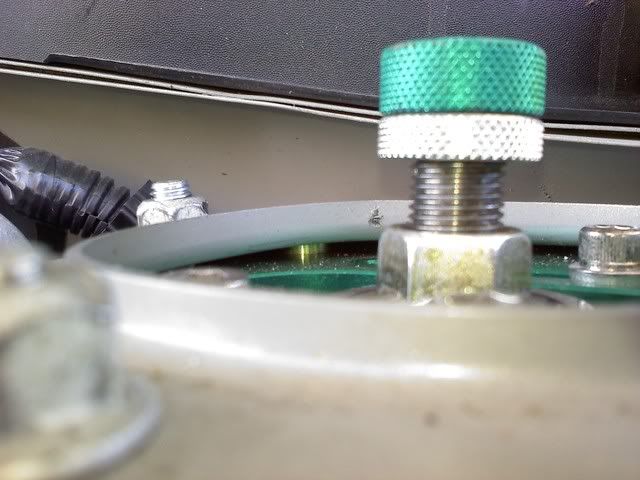
^Washer used to compensate^
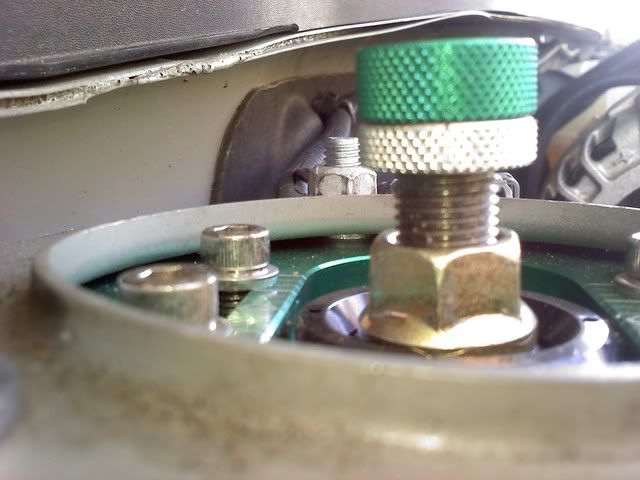
^Exposed sleeve and the gap it causes^
Since the driver side plate is flipped, the sleeves on the camber plate prevent it from sitting flush to the tower. so to prevent a lop sided suspension, you must place 2-3mm of washers (or whatever is closest to the thickness of the exposed sleeves on the other plate) between the passenger side camber plate and the strut tower. also be sure to put the same amount of washers in the same place between the plate and tower, though only on the one hole with no threading to esure stability of the mounting. if all is done correctly, the range of camber adjustment will point slightly forward, but only by a negligable amount.
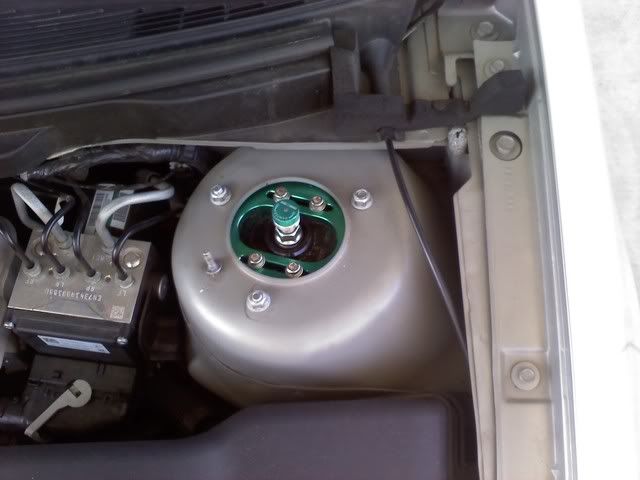 the plate will be completely fixed to the strut tower. if it budges, somethings seriously not tight enough.
The rest of the install is very straight-forward. Re-attatch the coilover to the pillowball mount in the center of the camber adjustment. Supporting the lower arm assebly with the jack, raise the assembly till the mounting hardware matches up betweenthe knuckle and the coilover. You have to wiggle the knuckle into its mounting place on the coilover as it is a rather snug, but secure fit. Hammer the studs in far enough to where you can pull them through with the nut, but first be sure to re-attach the mounting bracket for the lines that go to the hub and caliper and then screw on the nut, being sure to torque it down tight. Lastly position the sway bar with the jack, and secure the endlink to its mounting point on the coilover with the last nut you should have left. Once thats done on both sides, your install is finished! enjoy!

If something's unclear just ask!
And if you should choose to install these and your car crashes or breaks cause you didnt do it right, i am not liable!
To begin with, you have three brands of suspension to choose from. KW (most expensive), Ksport (alot less expensive), and what i chose, The Megan Racing variety. Design wise, the Ksport and Megan Racing are the same. the KW brand however, although more expensive, does not allow for adjustable camber and you need to buy extra components to make it come together.
This install is Megan Racing specific. i dont know if the ksport coilovers are EXACTLY the same, so i wont say they are, or that this how-to is directly applicable to both.
Part # for this install: MEG-MR-CDK-S9306
My humble suggestion would be, start with the rears. If worse comes to worse, and you find yourself at a lack for time, these go in substantially faster than the fronts. theres two bolts, and four nuts involved here. simple.
Using jackstands, support the rear of the vehicle on both sides. Then, with the wheel off, support the lower arm the spring rests on with a jack. Next, remove the two nuts securing the top of the shock to the body as well as the bolt holding the lower portion of the shock to the knuckle. With the shock out, you must now take the nut fastening it to the mount off. Grab the protruding metal tip with pliers or a vice grip so the whole assembly doesnt spin when loosening the nut.
To install the new damper requires you do everything in reverse with two little exceptions. The concave plate on the bottom of the mount is not needed as the new damper comes with a flat one, which fits flush in the bottom of the mount; the top one can stay. This is nessisary because the original plate shortens the amount of threads coming through the other side of the mount, making it nearly impossible to get a safe number of threads through the nut. speaking of which. the second exception, one of the two nuts that comes on the new damper is all you need to safely secure it in the mount; the old one is no longer needed. And there you have your rear dampers. Also be sure to use lock tite on the lower bolt as it uses nothing but torque to hold it in place, theres no nut there. (use a breaker bar for leverage.)
Next, to install your new rear adjustable springs, ensure that the arm the spring sits on is supported by a jack. otherwise you might be in for a little hurt when it comes free. There is a bolt and nut that attatch the arm to the knuckle. Remove them both and the arm should swing downward freely once you remove the jack. push down on it to retreive the old spring. What i have found through viewing the images of wormhole's install, as well as in my own expirience, is it is nessisary to remove the rubber seats for the old springs so as to ensure the spring assembly sit correctly, and so proper ride height front to rear can be achieved. Be sure everything youve unbolted and rebolted up is all torqued down nice and tight before you move to the fronts, its a PITA to have to go back and fix something you couldnt get right the first time.
On to the fronts!
OKAY. I'll be entirely honest. These are plausibly a one man job. But i must tell you two sets of hands makes life dramatically easier. And if you have changed out your front suspension before then this should be a piece of cake. I personally did not need a spring compressor at any point during this install. I had eibach springs in to begin with so that may have been a factor.
Where do i begin?
Jack up the front end and support both sides with jackstands. Remove the wheel, and detatch the brake lines from the strut. Depending on which direction the sway bar endlink is getting pushed, either being pulled up on or pushed down on by the strut mount, youll either have to push up on the the brake disk or the sway bar to take the stress off the top endlink mounting point. Using vice grips, hold the tip of the bolt stationary, while using a wrench to loosen the bolt holding the link in place. once that is done you can let the link hang off to the side, it wont be in your way. Now, with the lower arm supported, remove the studs holding the strut to the knuckle. once this is accomplished, remove the three nuts holding the strut to the strut tower. With that step completed, you should be able to lower the jack, and the stut will come down from the mount easilly. Now that the strut is removed, the one complicated thing about this install happens. The bolts that hold the normal strut to the the strut tower are not reusable. They are riveted into the original mount. because of this, you'll have to head over to home depot, to get six 8mm-1.25x40mm bolts in the hardware dept. Any shorter and your strut tower bar isnt going to fit properly. you will also need eight washers, i reccomend getting two sizes larger(10mm) so theyre easier to work with and you may as well get a few more than you need just in case.
The two pillowball mounts are exactly identical. this means, for some reason, to make them fit correctly, the driver side mount needs to be flipped. This means you lose the camber markings on that side, so mark where center is before you flip it.
The easiest way to mount these front suckers is top to bottom. So having taken the camber plates off the coilovers, put your shiney new bolts through the holes. One of the holes you will be using does not have the threaded sleeve so youll have to screw the nuts on the other two when mounting to the tower first, then stick the third bolt up through the plate and tower to have its nut tightened onto it. This is because the third threaded sleeve you would have used does not match up with the corresponding hole on the strut tower. So you must use the next hole beside it. The two plates shold look symmetrical beside one another before and after they are bolted into the strut tower.
^this diagram is just intended to help you get an idea for what im saying, as far as washers and bolt placement^
^Washer used to compensate^
^Exposed sleeve and the gap it causes^
Since the driver side plate is flipped, the sleeves on the camber plate prevent it from sitting flush to the tower. so to prevent a lop sided suspension, you must place 2-3mm of washers (or whatever is closest to the thickness of the exposed sleeves on the other plate) between the passenger side camber plate and the strut tower. also be sure to put the same amount of washers in the same place between the plate and tower, though only on the one hole with no threading to esure stability of the mounting. if all is done correctly, the range of camber adjustment will point slightly forward, but only by a negligable amount.
the plate will be completely fixed to the strut tower. if it budges, somethings seriously not tight enough.The rest of the install is very straight-forward. Re-attatch the coilover to the pillowball mount in the center of the camber adjustment. Supporting the lower arm assebly with the jack, raise the assembly till the mounting hardware matches up betweenthe knuckle and the coilover. You have to wiggle the knuckle into its mounting place on the coilover as it is a rather snug, but secure fit. Hammer the studs in far enough to where you can pull them through with the nut, but first be sure to re-attach the mounting bracket for the lines that go to the hub and caliper and then screw on the nut, being sure to torque it down tight. Lastly position the sway bar with the jack, and secure the endlink to its mounting point on the coilover with the last nut you should have left. Once thats done on both sides, your install is finished! enjoy!
If something's unclear just ask!
And if you should choose to install these and your car crashes or breaks cause you didnt do it right, i am not liable!


Comment