
 Tweet
Tweet
2005-2006 Pontiac G6 Headlight Mod How-To
By Mike Majdanski
DISCLAIMER: I am in no way responsible for any damage that may occur to your headlights or vehicle while or after performing this modification. The following information is provided for informational purposes only.
Tools required:
Two (2) screwdrivers, preferably flatheads.
1 Torx wrench (T-20x4”)
Heat source (optional), such as a hairdryer
Extra silicone sealant (optional)
NOTE: Before performing this mod, you may want to remove all the bulbs so that they don’t break by accident. There’s the lo-beam, hi-beam, signal, and running light (by the reflector on the side).
Ok, so the first thing you must do is get the headlight out. If you’re not sure how to do this, there are instructions in the owner’s manual. Once you pry that baby out, you’re good to go.
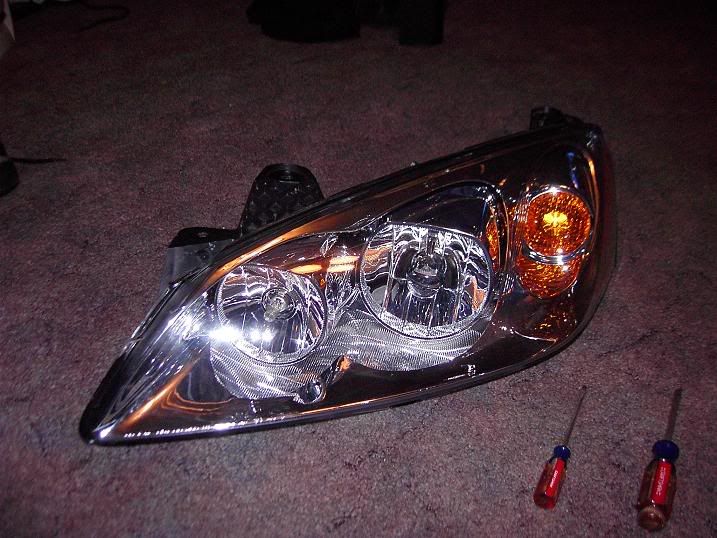
Look over the headlight carefully. There are a few things on here that could break off while performing this modification. While you don’t really want anything to break, it may happen and that’s life. The parts that may break, however, will not have any serious effects on the headlight.
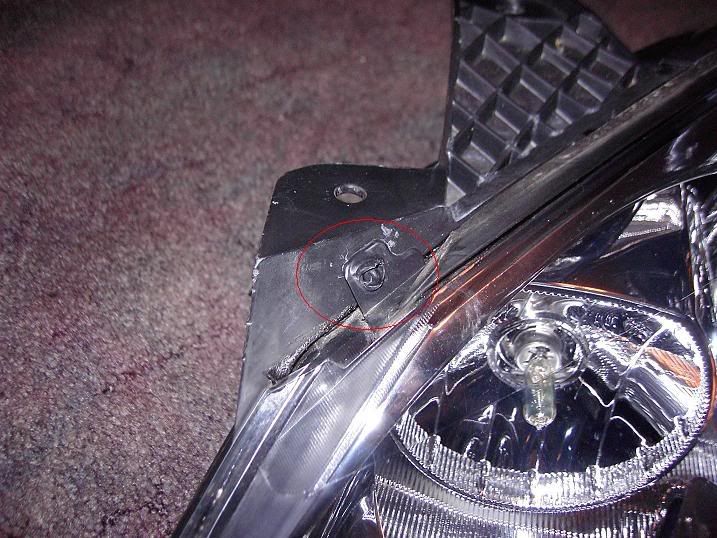
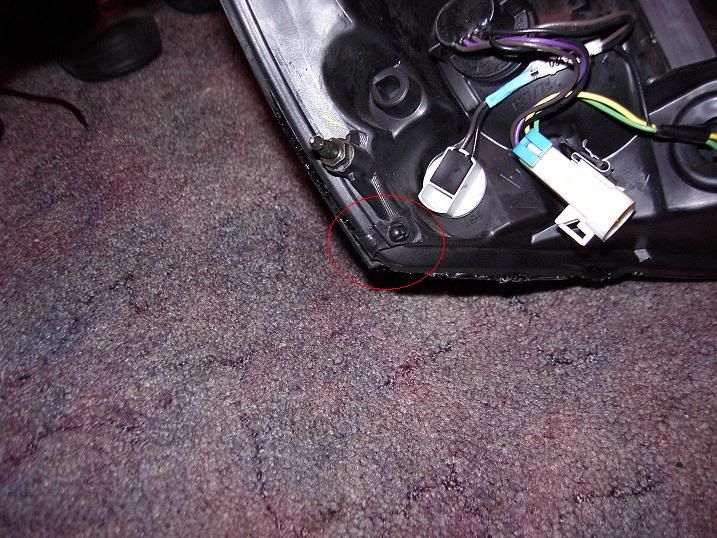
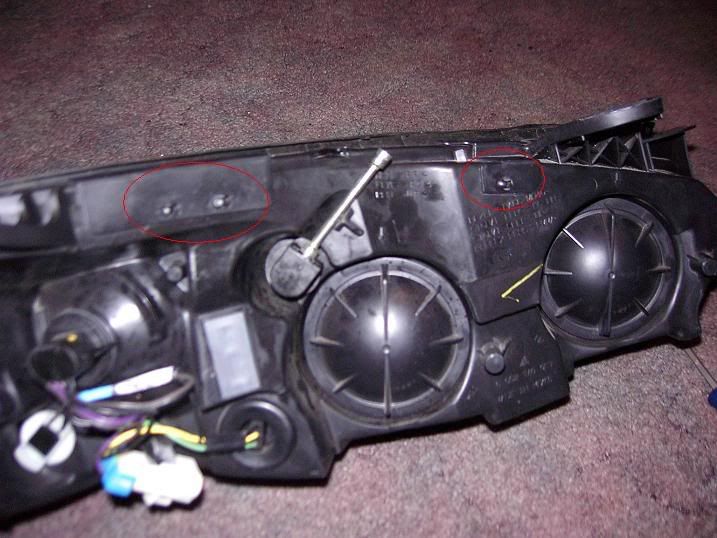
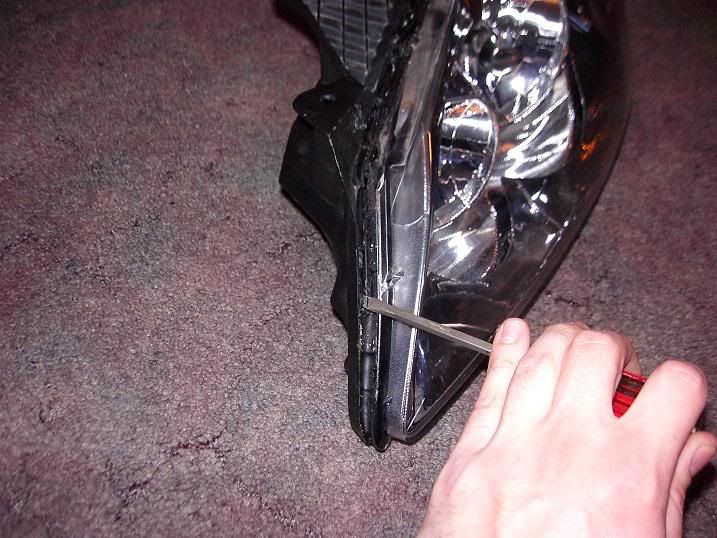
The first thing you have to get off is the weatherstrip. It is held on by a total of five plastic “knobs” on the back of the headlight. Identify the in the pictures below.
You may snap a few of these while removing the weatherstrip. It’s nearly impossible not to. But if you do, it’s no big deal putting a little superglue or silicone on them to hold them down. Here’s a tip, get a small flathead screwdriver and put it between the weatherstrip piece by the knob and the headlight. Carefully twist the screwdriver a little to try and pry the plastic on the weatherstrip up and over the knob. Once you pry them all up, you can pull the weatherstrip off.
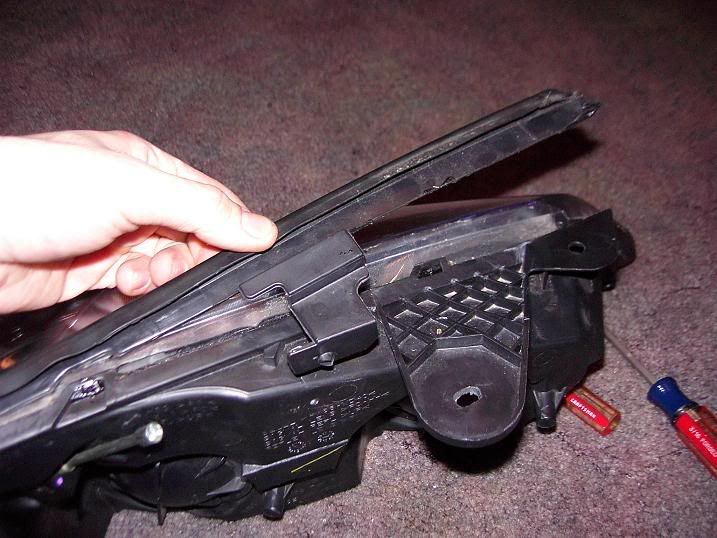
You’ll encounter some silicone on the side of the headlight by the reflector, so pull it off carefully, you don’t want to rip it.

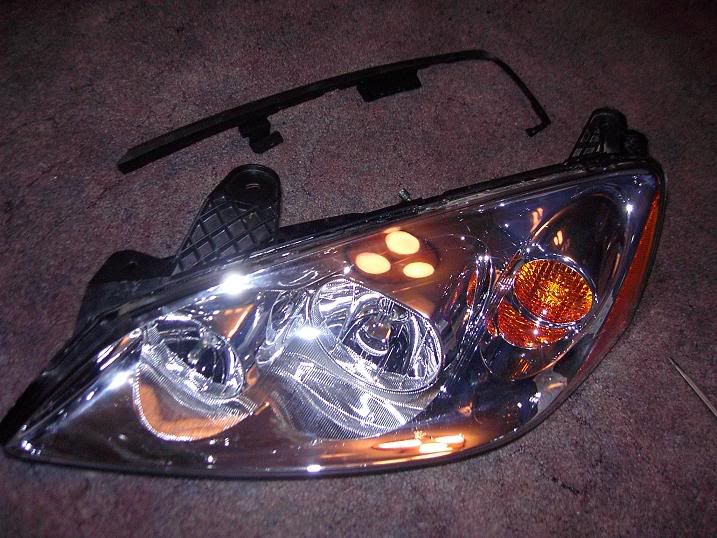
Here’s the headlight with the weatherstrip off.
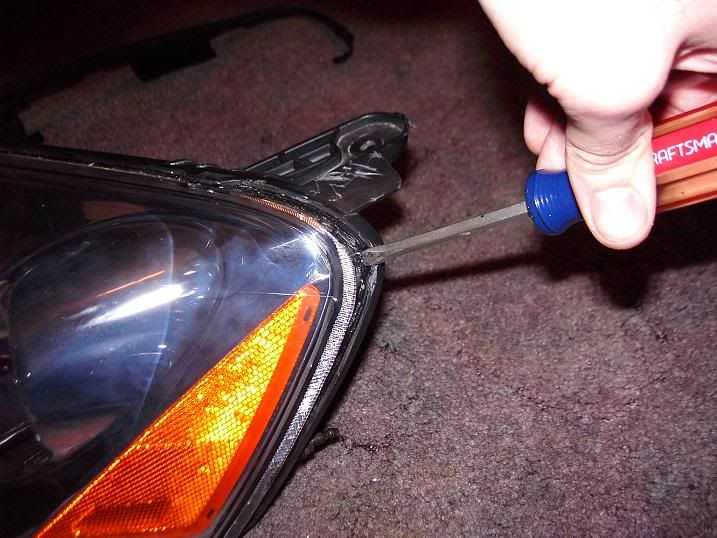
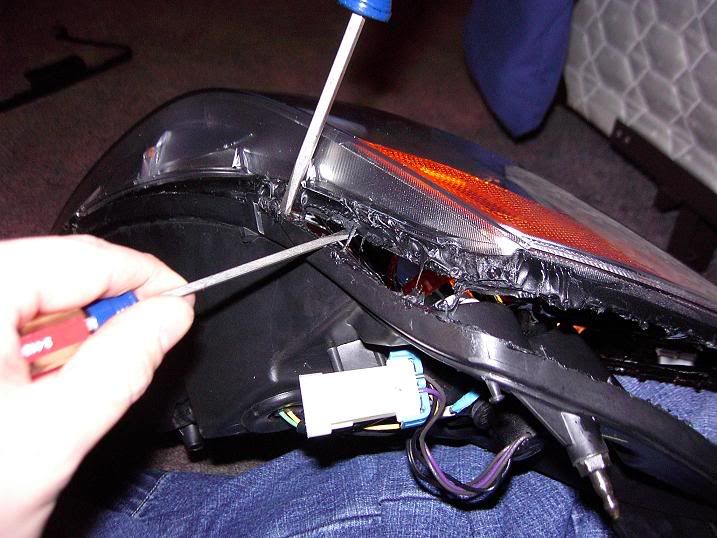
Now you need to separate the headlight. You must take this part slowly and carefully. Now, I’ve taken apart headlights before so I knew how to pry them apart, but if you want to make the job a little easier, get a hairdryer to heat up the edges around the headlight. If the silicone sealant is warmed up it will separate easier. You want to start at the side of the headlight where the amber reflector is. Take a flathead screwdriver and insert it in between the two parts on the headlight as shown
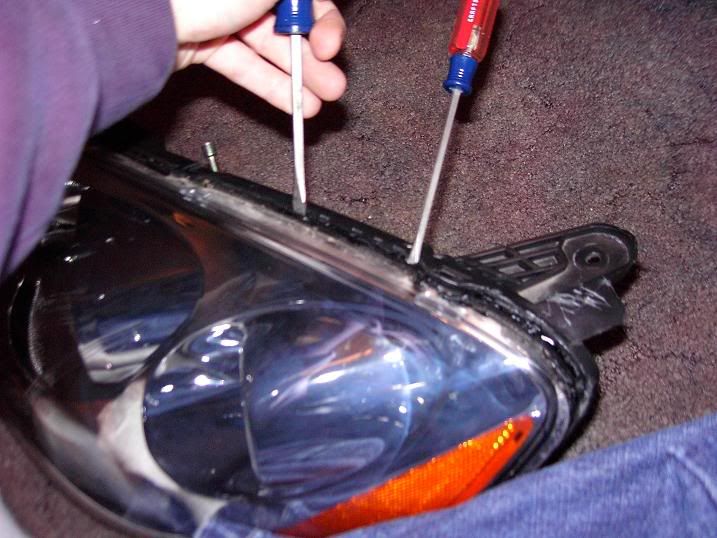
Now move the screwdriver back and forth, you will see the headlight start to separate. Notice the little black plastic clip that holds the other part of the headlight on. There are a few of these on both sides of the light. You have to pry this clip up and over the clear part it holds on or else it will break. Just take the a screwdriver and insert it under the clip. Lightly twist it until it starts to come up. Now with the other screwdriver, continue to pry the headlight apart, while at the same time twisting the other screwdriver to pop the clip off the little clear knob on the other half of the light. Again, it’s really no big deal if you break these little clips.
Now, take a second screwdriver, and insert it further down towards the center of the light, and pry that section open. You need to keep moving the two screwdrivers down further and further until you reach the other end of the headlight. And don’t forget to pop up the little black clips you encounter. I believe there are three on each side (top and bottom).
Once you get the end of the headlight, go back to the other side where you started (by the reflector), and work on the bottom of that side. Insert the screwdrivers and start to pry it apart.
Continue along with bottom the same way you did the top, carefully prying the headlights apart and popping up the little black clips. Once you get towards the end you’ll be able to just pull the headlight apart with your hands, and you’ll have the following:

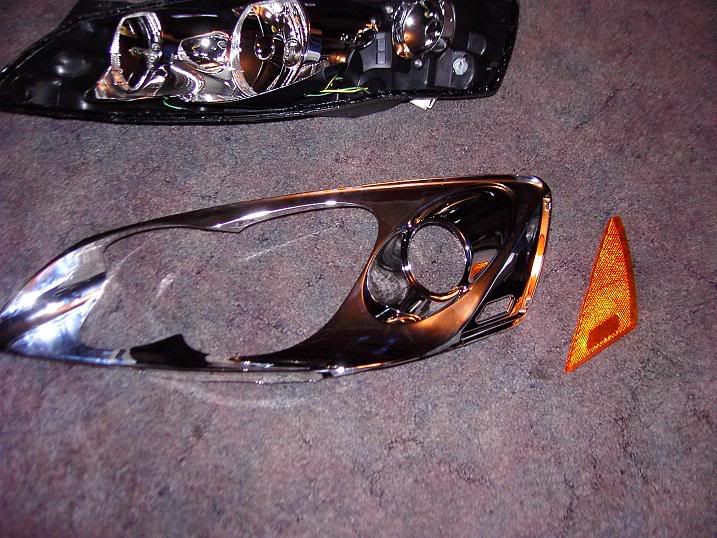
Now that the lights are apart, you can do what you wish with them. You can remove the assembly in the clear half of the light with the reflectors on them. There are two more torx screws holding that down.
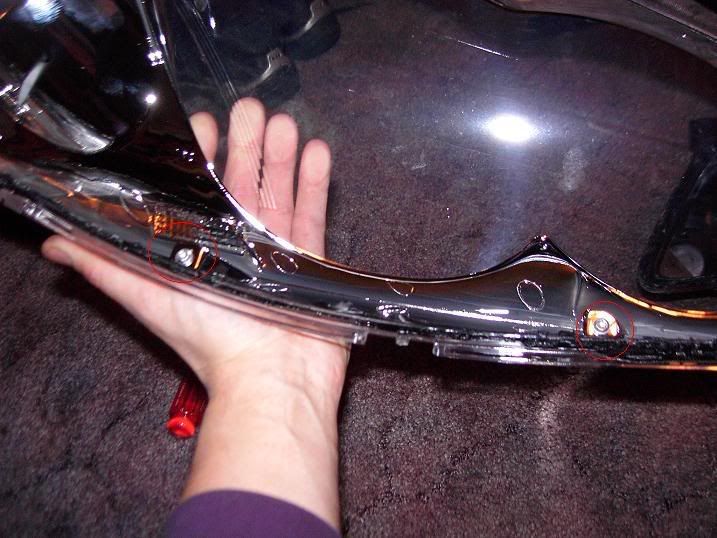
Once you remove the screws, you may have a tough time taking out that chrome piece. Look at the top of the light, there are notches in the chrome piece that fit into plastic pieces on the clear cover. You need to pop them out (just pull them). To get this chrome piece out, you have to use a little force, but be careful not to break it. Start pulling at the smaller end of the light (opposite the side with the reflector). You should be able to pull that side up first. Then pull along with top and move towards the corner where the reflector is. There may be some silicone holding the chrome piece in so you’ll need to run the screwdriver between the chrome piece and the clear cover to separate it. Then you should be able to pull out that side of the chrome piece.
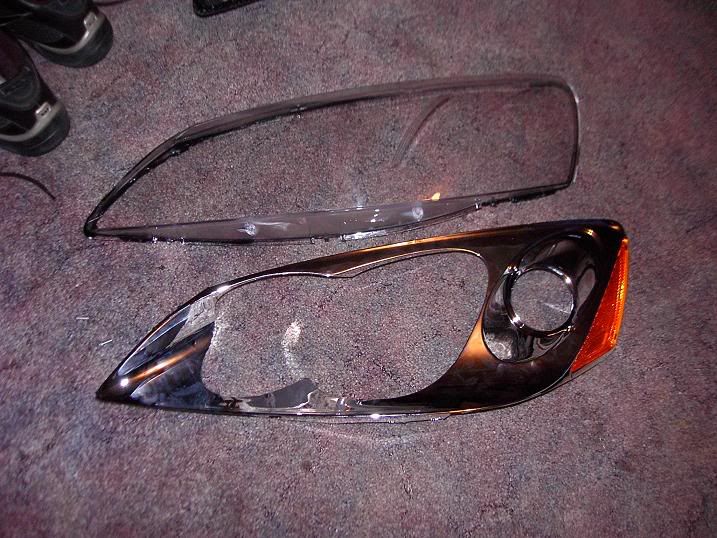
The circular reflector is also held in by two torx screws, you can remove this if you wish. Or you can just take off the amber part and put the circular chrome part back in screw it down.
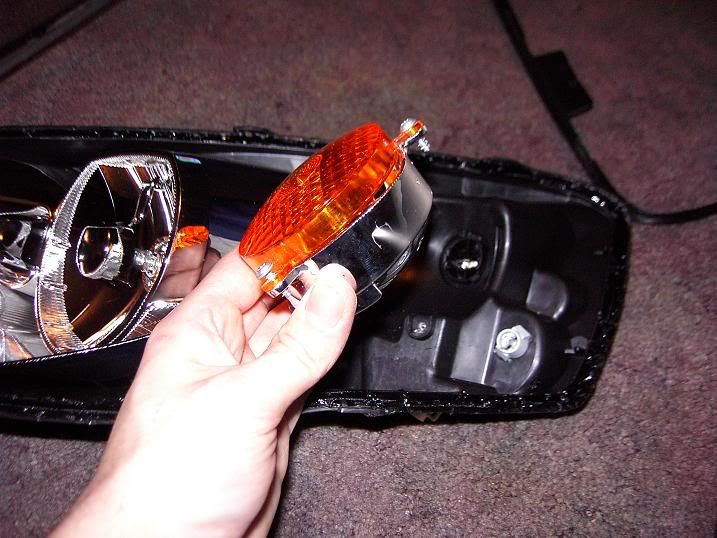
You can also remove the other amber reflector. It snaps in, so just take a flathead screwdriver, insert it between the reflector and the chrome piece where the little notches are, and twist it slightly. It will pop right out.
Reassembling the Headlights
Reassembling the headlights is just a matter of putting the chrome piece that you removed back in the headlight and sealing it up. You may need some extra silicone if you removed a lot of it while opening the lights. If there is still a significant amount left on both pieces, just heat them up to get the silicone soft, line up the two halves with each other, and squeeze them together. Make sure you remember to place the little black plastic clips over the clear knobs on the clear part of the headlight. Then place the weather strip on, over the black knobs on the back of the headlight, and use an adhesive on the knobs that broke off to hold the weatherstrip on. And that’s all there is to it! If you have any questions about this mod, feel free to email me at mikemaj82@hotmail.com or PM me at GTPGuy82. Good luck and happy modding!
Mike
By Mike Majdanski
DISCLAIMER: I am in no way responsible for any damage that may occur to your headlights or vehicle while or after performing this modification. The following information is provided for informational purposes only.
Tools required:
Two (2) screwdrivers, preferably flatheads.
1 Torx wrench (T-20x4”)
Heat source (optional), such as a hairdryer
Extra silicone sealant (optional)
NOTE: Before performing this mod, you may want to remove all the bulbs so that they don’t break by accident. There’s the lo-beam, hi-beam, signal, and running light (by the reflector on the side).
Ok, so the first thing you must do is get the headlight out. If you’re not sure how to do this, there are instructions in the owner’s manual. Once you pry that baby out, you’re good to go.
Look over the headlight carefully. There are a few things on here that could break off while performing this modification. While you don’t really want anything to break, it may happen and that’s life. The parts that may break, however, will not have any serious effects on the headlight.
The first thing you have to get off is the weatherstrip. It is held on by a total of five plastic “knobs” on the back of the headlight. Identify the in the pictures below.
You may snap a few of these while removing the weatherstrip. It’s nearly impossible not to. But if you do, it’s no big deal putting a little superglue or silicone on them to hold them down. Here’s a tip, get a small flathead screwdriver and put it between the weatherstrip piece by the knob and the headlight. Carefully twist the screwdriver a little to try and pry the plastic on the weatherstrip up and over the knob. Once you pry them all up, you can pull the weatherstrip off.
You’ll encounter some silicone on the side of the headlight by the reflector, so pull it off carefully, you don’t want to rip it.
Here’s the headlight with the weatherstrip off.
Now you need to separate the headlight. You must take this part slowly and carefully. Now, I’ve taken apart headlights before so I knew how to pry them apart, but if you want to make the job a little easier, get a hairdryer to heat up the edges around the headlight. If the silicone sealant is warmed up it will separate easier. You want to start at the side of the headlight where the amber reflector is. Take a flathead screwdriver and insert it in between the two parts on the headlight as shown
Now move the screwdriver back and forth, you will see the headlight start to separate. Notice the little black plastic clip that holds the other part of the headlight on. There are a few of these on both sides of the light. You have to pry this clip up and over the clear part it holds on or else it will break. Just take the a screwdriver and insert it under the clip. Lightly twist it until it starts to come up. Now with the other screwdriver, continue to pry the headlight apart, while at the same time twisting the other screwdriver to pop the clip off the little clear knob on the other half of the light. Again, it’s really no big deal if you break these little clips.
Now, take a second screwdriver, and insert it further down towards the center of the light, and pry that section open. You need to keep moving the two screwdrivers down further and further until you reach the other end of the headlight. And don’t forget to pop up the little black clips you encounter. I believe there are three on each side (top and bottom).
Once you get the end of the headlight, go back to the other side where you started (by the reflector), and work on the bottom of that side. Insert the screwdrivers and start to pry it apart.
Continue along with bottom the same way you did the top, carefully prying the headlights apart and popping up the little black clips. Once you get towards the end you’ll be able to just pull the headlight apart with your hands, and you’ll have the following:
Now that the lights are apart, you can do what you wish with them. You can remove the assembly in the clear half of the light with the reflectors on them. There are two more torx screws holding that down.
Once you remove the screws, you may have a tough time taking out that chrome piece. Look at the top of the light, there are notches in the chrome piece that fit into plastic pieces on the clear cover. You need to pop them out (just pull them). To get this chrome piece out, you have to use a little force, but be careful not to break it. Start pulling at the smaller end of the light (opposite the side with the reflector). You should be able to pull that side up first. Then pull along with top and move towards the corner where the reflector is. There may be some silicone holding the chrome piece in so you’ll need to run the screwdriver between the chrome piece and the clear cover to separate it. Then you should be able to pull out that side of the chrome piece.
The circular reflector is also held in by two torx screws, you can remove this if you wish. Or you can just take off the amber part and put the circular chrome part back in screw it down.
You can also remove the other amber reflector. It snaps in, so just take a flathead screwdriver, insert it between the reflector and the chrome piece where the little notches are, and twist it slightly. It will pop right out.
Reassembling the Headlights
Reassembling the headlights is just a matter of putting the chrome piece that you removed back in the headlight and sealing it up. You may need some extra silicone if you removed a lot of it while opening the lights. If there is still a significant amount left on both pieces, just heat them up to get the silicone soft, line up the two halves with each other, and squeeze them together. Make sure you remember to place the little black plastic clips over the clear knobs on the clear part of the headlight. Then place the weather strip on, over the black knobs on the back of the headlight, and use an adhesive on the knobs that broke off to hold the weatherstrip on. And that’s all there is to it! If you have any questions about this mod, feel free to email me at mikemaj82@hotmail.com or PM me at GTPGuy82. Good luck and happy modding!
Mike


Comment